Work with Dental System™ on Multiple PCs simultaneously
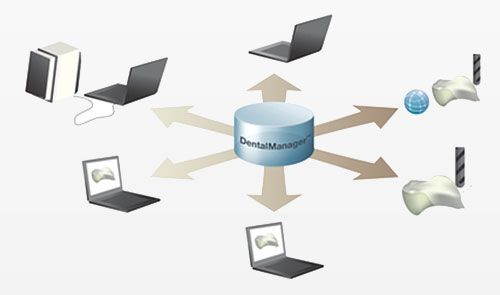
Did you know that Dental System™ gives you the unique, powerful and productive option of running multiple PCs in a network and smoothly sharing orders and files? The multiple PC installation (client-server) enables one or more operators to create the order, scan and design in parallel.
The Multiple PC installations consist of one Server PC and one or more Client PCs in the same network. All software and the order database are stored locally on the Server PC with the drives mapped as network drives so they can be seen by the client PCs. The Client PCs simply link to the software and order database on the Server computer.

Advantages of Multiple PC installations:
- Highly productive option for one or more operators to create orders, scan and design in parallel.
- The simplicity of maintenance and upgrades.
- Easy sharing of orders, states, and files across multiple PCs.
- Client PC can be installed and operated from any PC within the network - you are not limited to work on a specific PC. Licenses are floating and directly shared between all PCs in the network, i.e., a single CAD license can be used on any Client PC, but only one at the time.
Performance Recommendations
Performance-wise hardware recommendations can be addressed for each component of the system separately:
- Server PC - Hard Drive speed and network bandwidth are important for the server and database operation performance.
- Client PCs - The amount of RAM and Video memory is important for scanning and design performance.
- Network - Ethernet-based network.
To avoid slowing down the system with a large number of orders, please close all finished orders to keep the number of open orders in Dental Manager to a minimum.
Client-Server Installation process
Before doing a Client PC installation, you must ensure that the computer has a unique name in the network. Follow these steps to set up a Dental System™ Server or a Network Client:
Step 1: Launch 3Shape Dental System™ Installer
Read the Dental System™ Installer chapter in the online Help Manual to prepare for and initiate the installation process. The manual can be accessed by pressing F1 in Dental Manager.
Step 2: Select Custom installation
Step 3: Specify installation settings

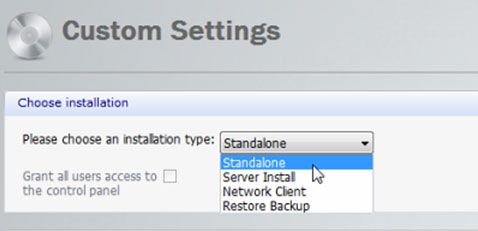
Select Server Install or Network Client from the drop-down menu in the Custom Settings window and specify the necessary settings for the chosen option.
Click Continue to proceed.
- Always start with the Server installation! Client installations can only be created after setting up an active Server installation.
- It is also important that you place the dongle in the Server PC. In case you have multiple dongles it is strongly recommended to consolidate all your licenses on a single dongle. Please contact your 3Shape re-seller to consolidate the licenses.
Step 4: Complete installation
Follow the on-screen instructions and complete the installation process.