Have you ever heard of that unseen line on the earth that separates the two hemispheres? The equator? There are also mystical lines that delineate the notorious Bermuda Triangle, and to this day, ships even orientate themselves to avoid them for fear of disaster.
Well in the intraoral scan frontier you might be surprised to learn that there are also important lines that you will encounter. Albeit not so dramatic, you will be faced with them in every single scan you attempt. The way you navigate them can mean success or failure for your clinical indication when it relates to occlusal referencing and digital bite scan taking.
The tech of the bite scan
A few months back, I contacted a senior tech from 3Shape to gain a better understanding of how the bite scan technology works. I was hoping that the information might help me gain better and more precise clinical outcomes for my patients. We spoke for a long time and to be honest, most of the tech terminology flew miles over my head. As my layman brain understood it, the scanner is looking for common threads that it can image map and put into some semblance of organisation and order. If all the images line up to a degree that the device can measure and logically place, you will hear that sweet-sweet melody resonating from your computer and the Maxilla/Mandible relation (MMR) or for us, bite scan, will be secured.
The Bermuda midline of digital dentistry
Enter the Bermuda Midline. You might be saying to yourself, “Leif, bit of an exaggeration, that bite scan line isn’t scary at all,” and yet, when you are recording bite scans across full arch quadrants, crossing that magical midline might be more important than you think. When I take bite scans with very few opposing teeth, I have found from experience that unless I scan past the midline in one full bite scan I will not hear that delightful tune.
The reason scanning past the midline is so difficult to do in one go is as you approach that point, your body and hand position starts to get very cramped and tied up. You might be thinking: well why don’t you just perform the old ‘scanner spin’ move? Well with cords, hardware, and real life, it isn’t always so easy. I have learnt from over 2,500 patient scans that taking the scanner out of the mouth and then relocating in a reverse hand position is the easiest way to continue scanning past the Bermuda Midline.
Why cross the line?
The primary reason I go past the midline in complex full arch bite record taking, is that you need to collect as much data as possible to aid the system in putting all the pieces of the bite puzzle together. This might mean taking the scanner out of the mouth (don’t push the button to stop recording though), repositioning your body - hand and scanner - and then putting it back in the mouth for additional record taking by picking up where you left off. If you go past the midline in the first stage, finding a re-reference point to continue the bite into the next quadrant is much easier.
You’ll note that in addition to hand technique, clear instructions for the patient are critical.
Here are my steps in standard bite taking as well as a supplementary section on enhanced bite taking for cases when you need to cross the midline. Do this for every bite (even small quadrant bites):
- Explain to the patient what you are doing. Explain that once you have them in a desired position, you would like them to stay perfectly still as you scan the bite.
- Ask the patient to close into your desired bite position and take a mental picture of where the teeth are. Your mind will be your relocation confirmation (don’t worry it’s reliable, especially if you take mental note of some obvious contact point landmarks).
- Ask the patient to open as you pop your scanner into the mouth and use it to retract the cheek while they slowly close. Before you push the go button, get the scanner head as far down into the posteriors as you can.
- Say these words, calmly and clearly, “When I record your bite can you please stay very, very still until I tell you that we are finished.” Don’t forget when crossing the midline, you might need to take the scanner out of the mouth. I have found that this becomes an instant signal to the patient to open or relax and move their bite position. So, it’s important to reinforce that “I may need to take the scanner out of your mouth to reposition it, so please stay closed until I say we are all done.”
Midline crossing bite steps for enhanced bite taking
- Good scans breed good bites: Behind every great man is an even greater woman. And behind every great bite is an even better upper and lower scan record. You can’t expect an easy bite process for complex occlusions if you haven’t taken at the very least great buccal images. In short, the better and more complete your upper and lower arch scans, the better the tech works for bite record taking. Fact!
- Visualise and establish a path: It’s important to visualize the path that you intend to follow as you cross the midline of the patient’s mouth. If for example, you have a case with all the upper anteriors standing (in natural or artificial dentition) and no lower anteriors are present, but you do have premolars present (say 34,35,44,45 are standing). In this instance, I would use the upper dentition to bridge across the midline and make your way to the next proprioceptive contacts points.
- “Don’t stop ‘til you get enough”: Let those Jackson five song lyrics play in your mind once you push that scanner button to record a bite scan. When you have crossed the midline, do not push the button, and cease your scan. Keep the scanner running as you take it out of the mouth and reposition your hand/body posture and get ready for continuing the bite scan from a reference point across the midline. Around two years ago, the finding of a re-reference point to continue the same scan was quite tricky. It appears that the later software updates have made this much easier.
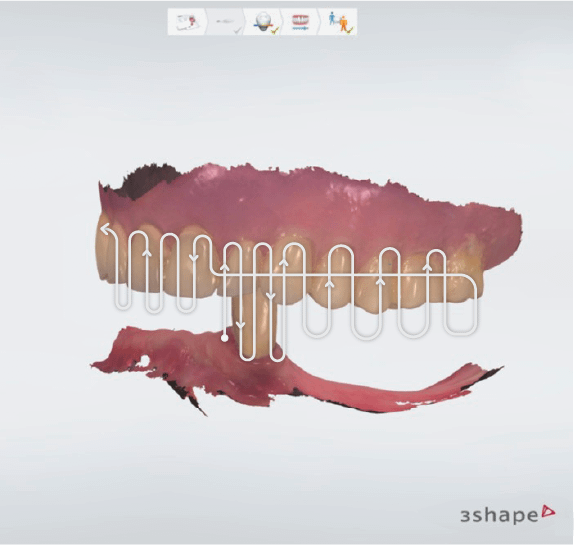
- Follow the crowd: Last point to note is every complex bite is different. Always start where there is the most natural tooth-to-tooth contact. If it’s only one tooth in the 33 position occluding with a full upper denture, then that becomes your midline and you will need to record the left and right side of that point in one go. I have included a complex case along with my bite scan path in order to give you some inspiration on how I recorded this impossible bites. No two bites are the same so learn these principles and then forge your bite path to success. Be fearless!
No occlusion will be too hard for you to record!
Digital bite taking can really enhance accuracy and speed up your treatment procedures. The pursuit of mastering this as a digital practitioner is priceless. Quite literally, the economics of mastering on the spot digital bite taking runs into the hundreds for every case you are successful. Work hard on your communication with the patient before starting the bite scan. If the scan simply isn’t aligning, there is a very good chance the patient is moving and both you and they just don’t realize it, or your initial arch scans could be lacking. Crossing the midline on complex bite records is such a valuable skill to have in your digital arsenal. Practice it, visualize it, and perfect it, so there will be no occlusion too hard for you to record. Armed with this knowledge not even the Bermuda Midlines will be able to stop you!